stay home photo tip #3: an intro to light
April 24, 2020
Light.
It’s one of the things that separates bad photographers from good ones, and good photographers from great ones. It plays a huge role in any photograph, and yet most people don’t fully understand how to use it, or how to make it work to their advantage.
Truly understanding how to use and create light like a pro takes years of practice—so that’s NOT what we’re going to attempt here. But it’s one of the most frequently voiced frustrations I hear from my clients who have tried taking their own photos at home.
So I started by asking my small business friends and clients what they struggled with most—and as it turns out, a lot of you are facing the same difficulties in your at-home photography efforts. Many of these issues can be addressed by gaining just a basic understanding of some fundamentals of light use, and then experimenting with them—so we’re going to focus on 2 things: identifying your light source, and positioning it.
IDENTIFY YOUR LIGHT SOURCE
The first step to using and controlling your light for better photos is to identify and choose a light source. It sounds simple, but it’s something I’ve found a lot of people really don’t think about at all.
This doesn’t mean turn on every light in the room for the MOST light—in fact, quite the opposite. Take this example of my morning coffee mug on the dining room table. In the first image, I haven’t chosen a light source. The overhead light in the room is on, and the blinds are open for windows on 2 walls. In the second, I’ve turned off the overhead light but left all of the blinds open on both walls. In the third, I’ve turned off the overhead light and closed the blinds on one window, thus identifying a single light source to work with.
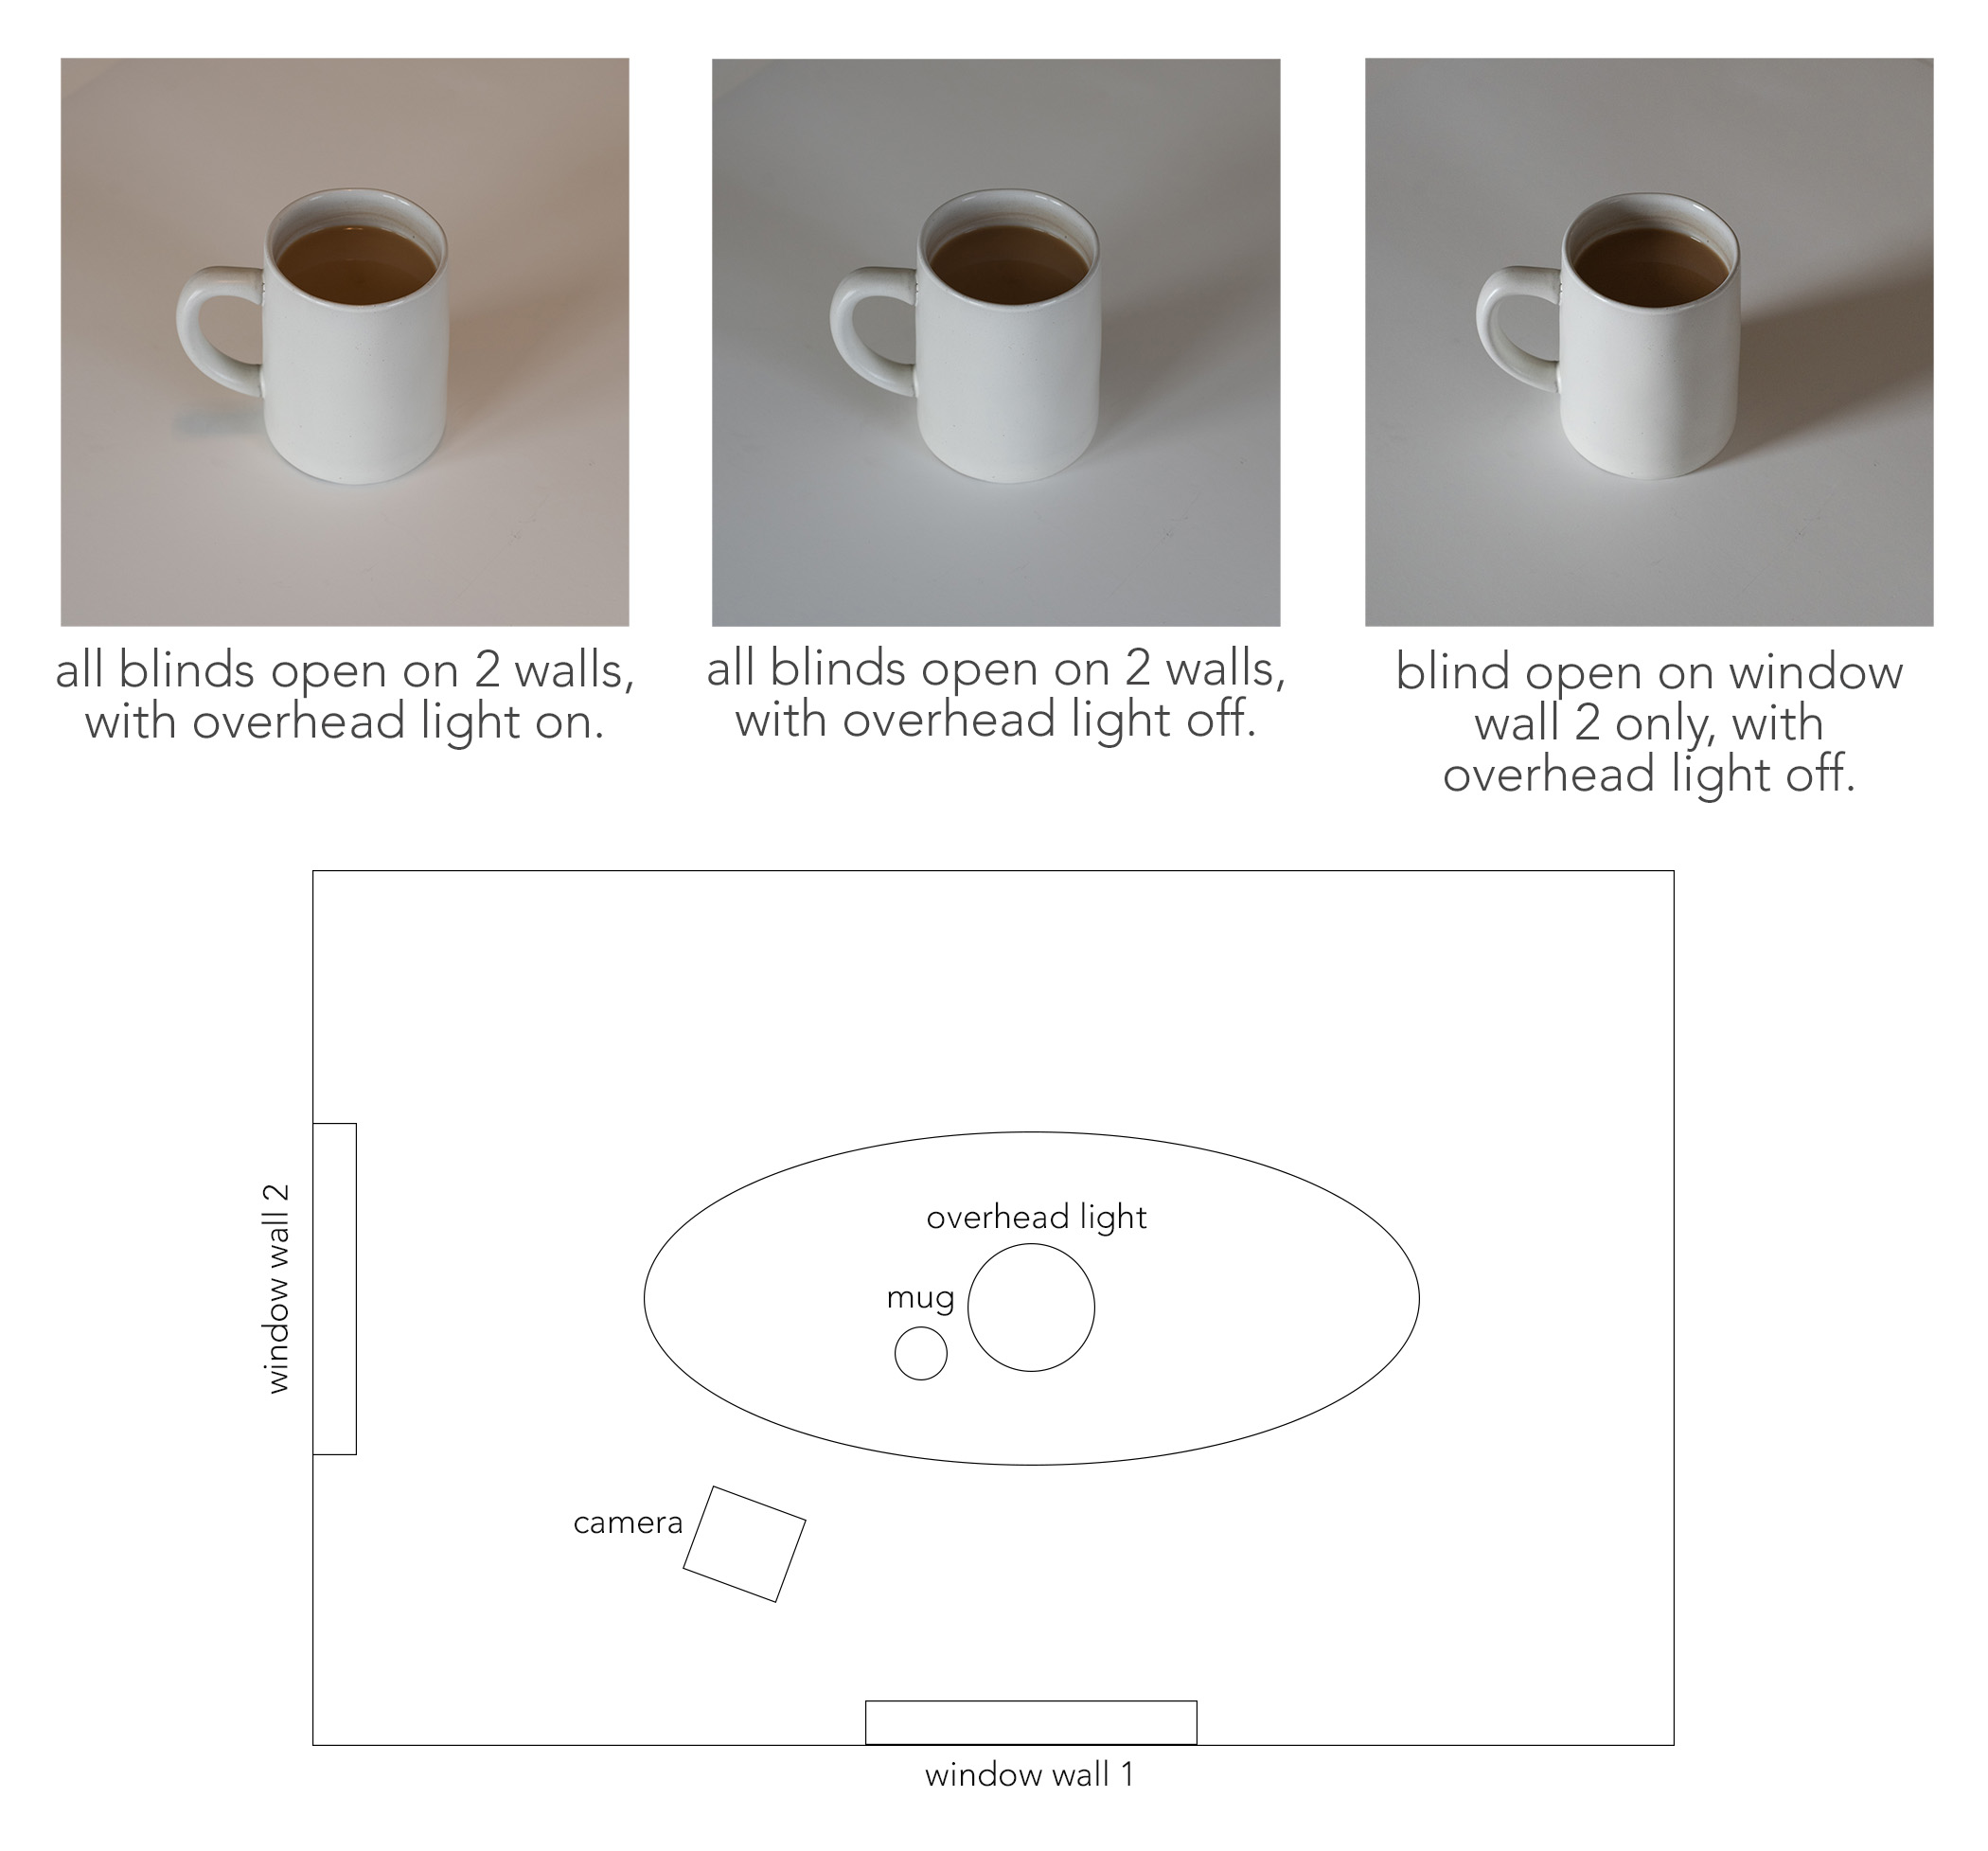
Do you see how drastically it changes my image? Watch the shadows change, the shape of my mug become more defined, and the color shift. Just by simply identifying our light source and blocking out the extraneous ones, we have completely changed our image.
You can work with multiple light sources, of course—but when you’re first starting out learning how to use light, it’s much easier to understand and get the hang of controlling your light working with a single light source, so that’s what we’re going to focus on. (It’s also my favorite style of lighting, and if used regularly will lend your work a consistent look and feel.)
CHOOSING A LIGHT SOURCE
Your light source doesn’t have to be a window. Whether your light source is natural or artificial, the principles remain the same. We’re going to work with a window, since everyone has one of those—but if you have a small studio light at home, you can practice using that the same way.
When choosing a light source, it’s also important to note that the bigger your light source is, the broader and more even your light will be, and the softer your shadows.
Also remember that if you’re using a studio light, you’ll have a lot more consistency from your light source. You’ll notice that a window will give you different light at different times of day, on different days. The bright, direct sun will act as a smaller, more direct light than, say, a cloudy sky through the window, or a time of day when the sun is on the other side of the house.
We’ll talk about modifying your light source in my guide at the end of this post, but just keep in mind that when you’re working with natural light, like a window, nature does a lot of modifying for you depending on the time and kind of day you shoot.
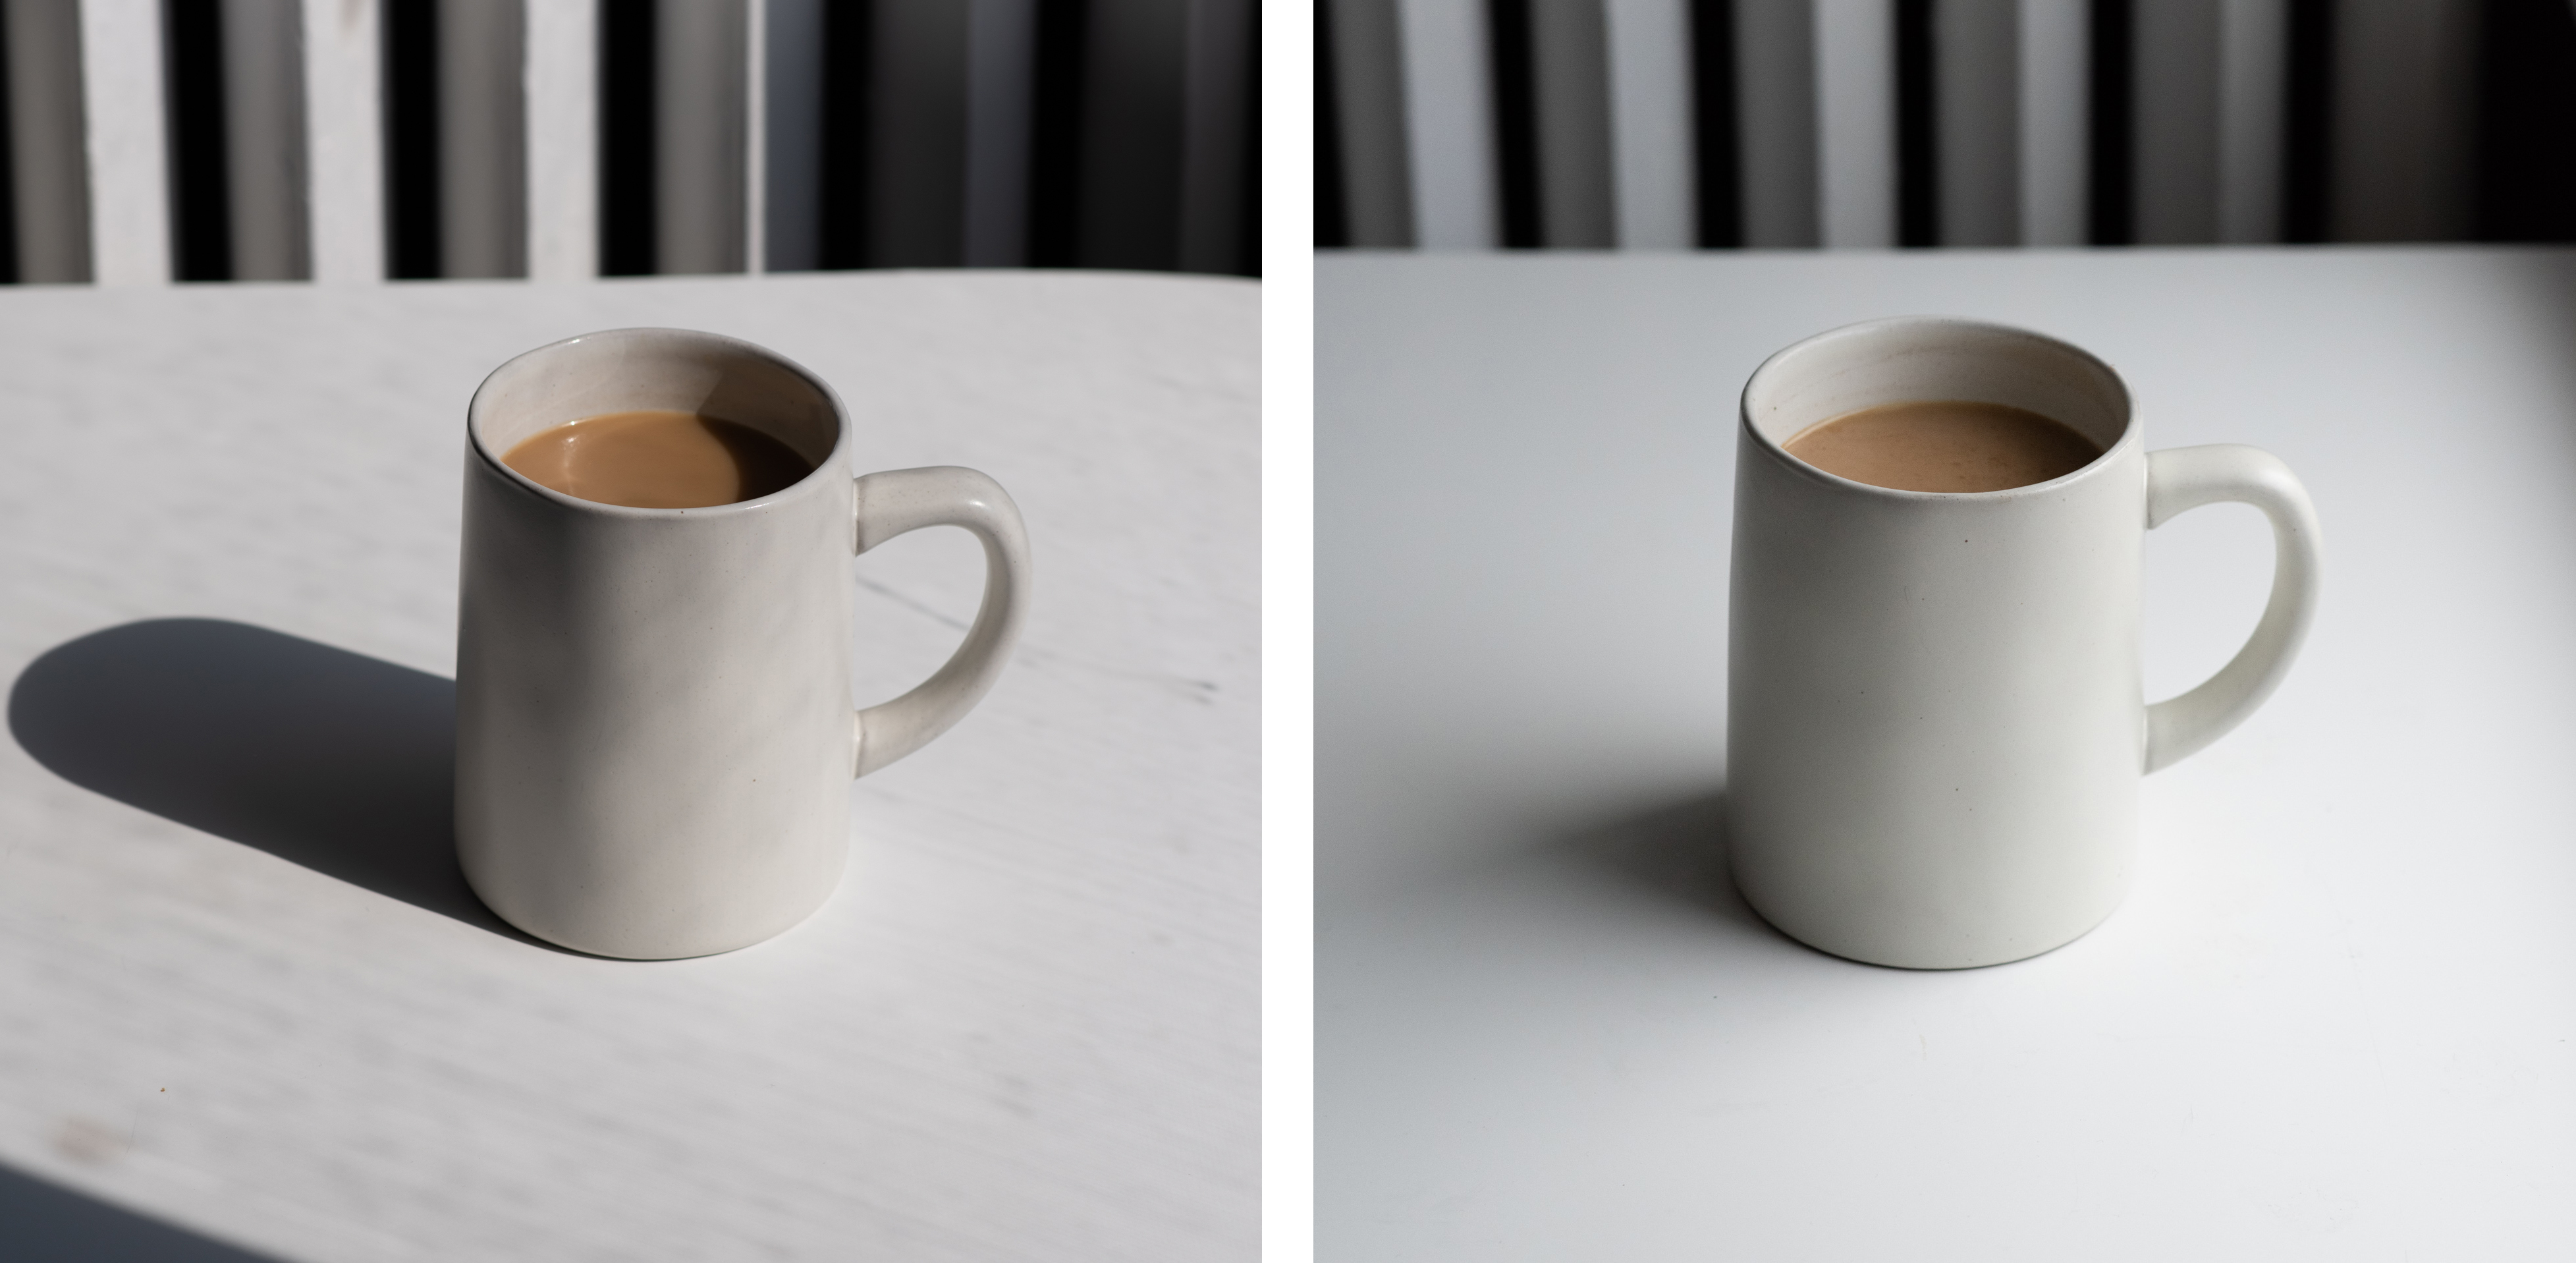
The first image below was taken on a bright, sunny morning, and the second on a cloudy morning. You can see what a huge difference in light you’ll get using the same window on a different day.
POSITION YOUR LIGHT
Now that we understand the importance of consciously choosing a light source, let’s talk about where to put it. Have a look at these three examples. Each of these images uses the same light source, but in three different positions in relation to my camera and my subject.
In the first, my light source is behind my coffee mug, and I am shooting into the light. In the second, I am shooting with the light to the side of my subject. In the third, I am shooting with the light source directly behind me, and thus directly in front of my subject.
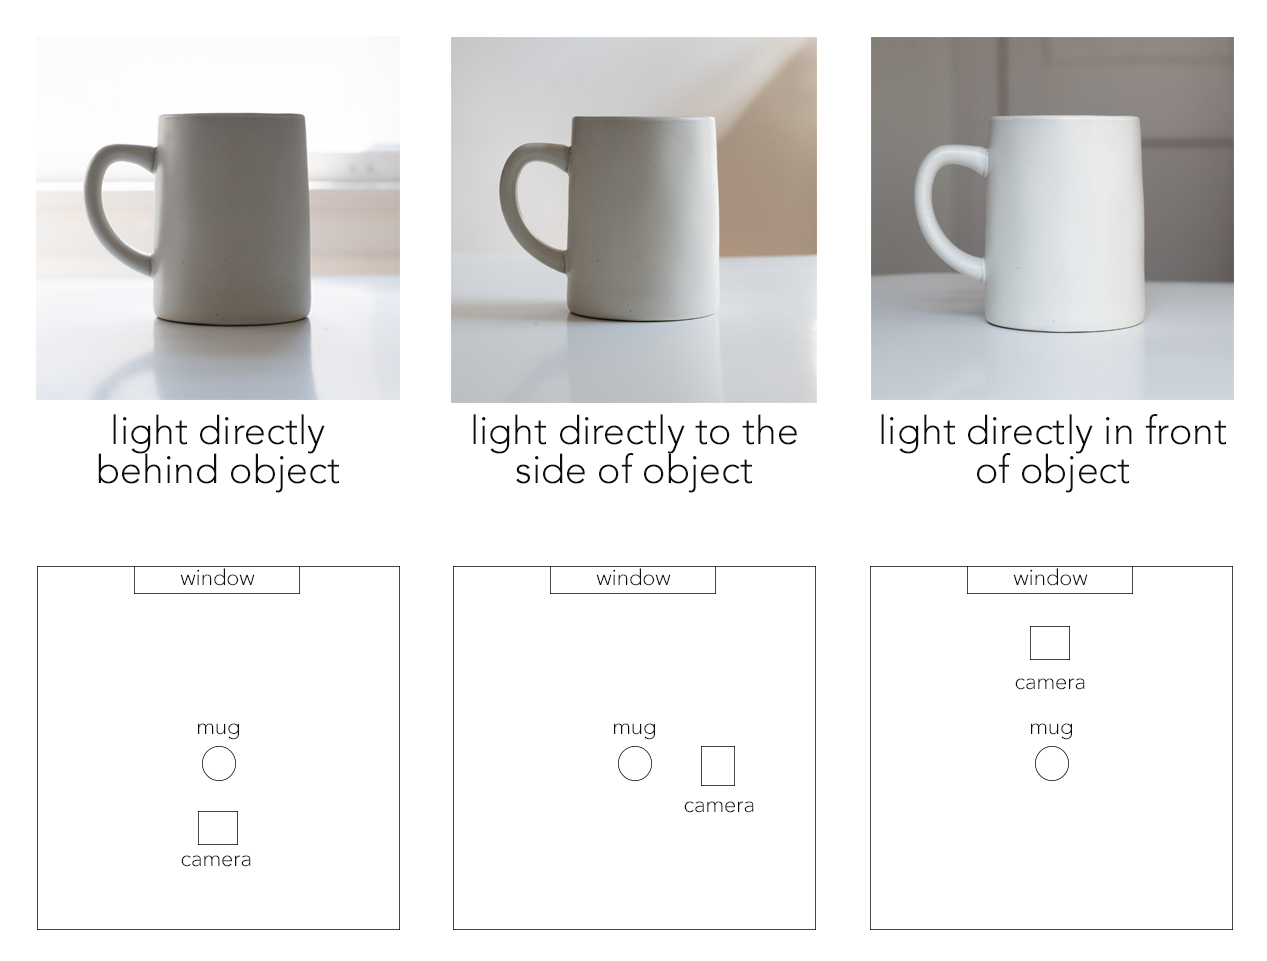
Do you see what a huge difference it makes to change where you place your light source?
When the mug is backlit, we lose any definition of the mug in terms of shape, texture, and detail. When it’s lit from the front, it’s a much nicer shot, but the lighting is very flat, so we still lose a lot of that shape and texture. If we light it from the side, you can see that it gives the mug highlights and shadows that define its shape, and bring out the texture of the mug.
This isn’t to say “light all objects from the side.” In fact, quite the contrary. It’s important to experiment with different light setups to see what works best, and then adjust your light until you find what works. Every scene has unique variables to take into account, and lighting is by no means one-size-fits-all.
This is also true, and especially important to understand when shooting portraits. To demonstrate, here are the same three setups, but with me, instead of my mug.
Again, you can see what a huge difference it makes to place your light source in different positions in relation to your subject.
But in this set, I also want you to pay particular attention to my eyes. In the last image, you can see what are called “catch lights,” which are the reflection of your light source in your subject’s eyes. Catch lights are what give your subject life.
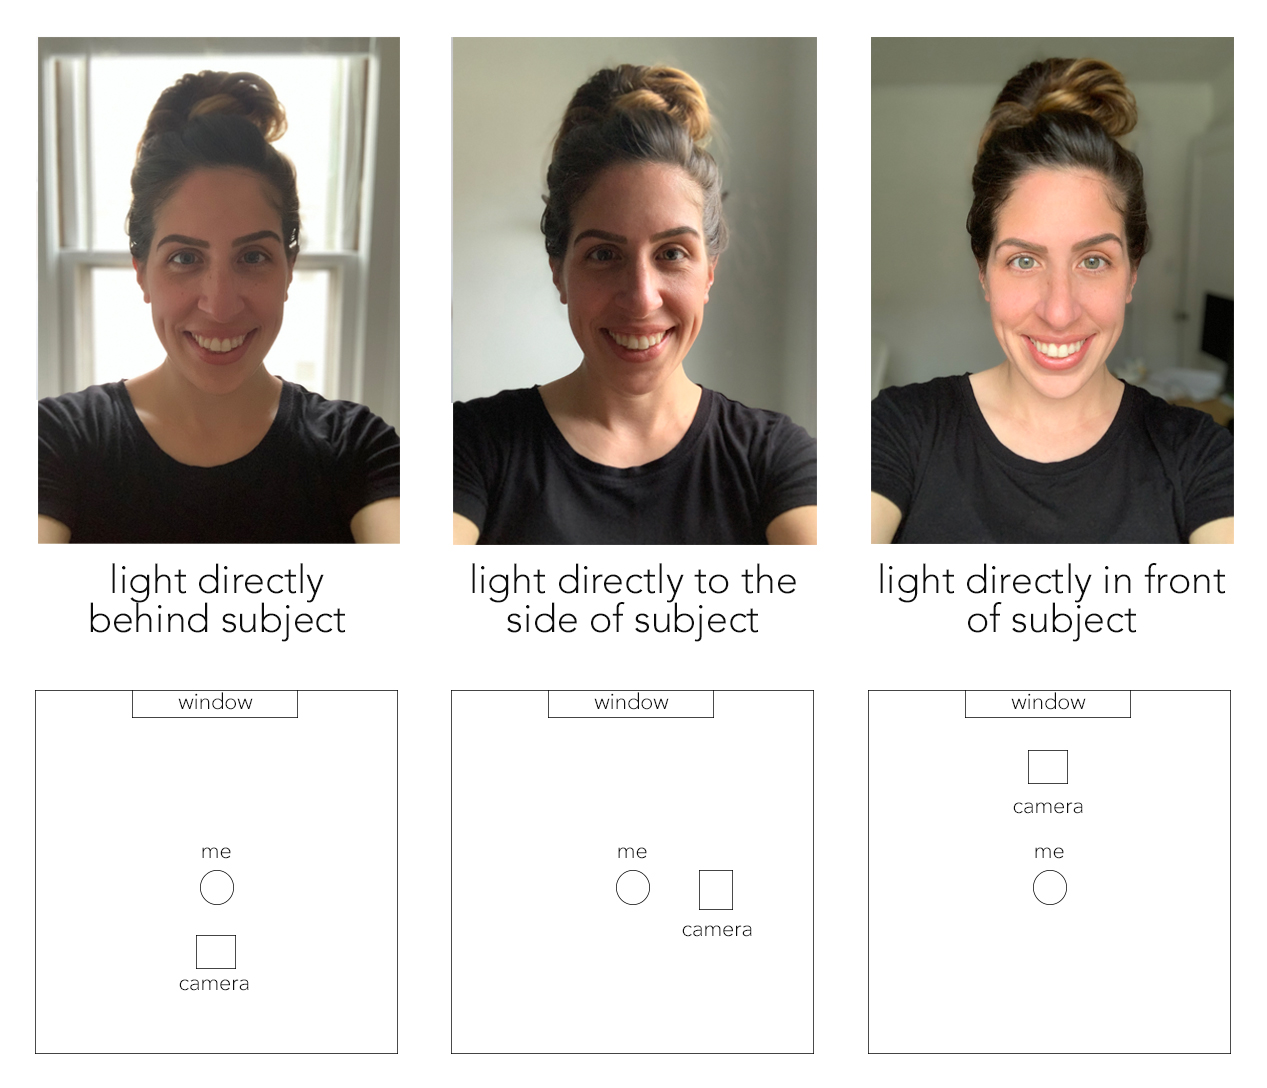
Again, this is not to say “light your subjects straight from the front.” In fact, my favorite place to put my light source is somewhere between the second and third images shown here, at a 45-degree angle toward my subject. There, you’ll find you get those catch lights in the eyes, but also get beautiful highlights and shadows that give the face much more definition than the flat, frontal lighting.
I recommend starting there, and turning your subject toward, and away from the light, observing what happens when you do. You’ll be amazed at how much you can change a portrait just by altering and adjusting your light placement.
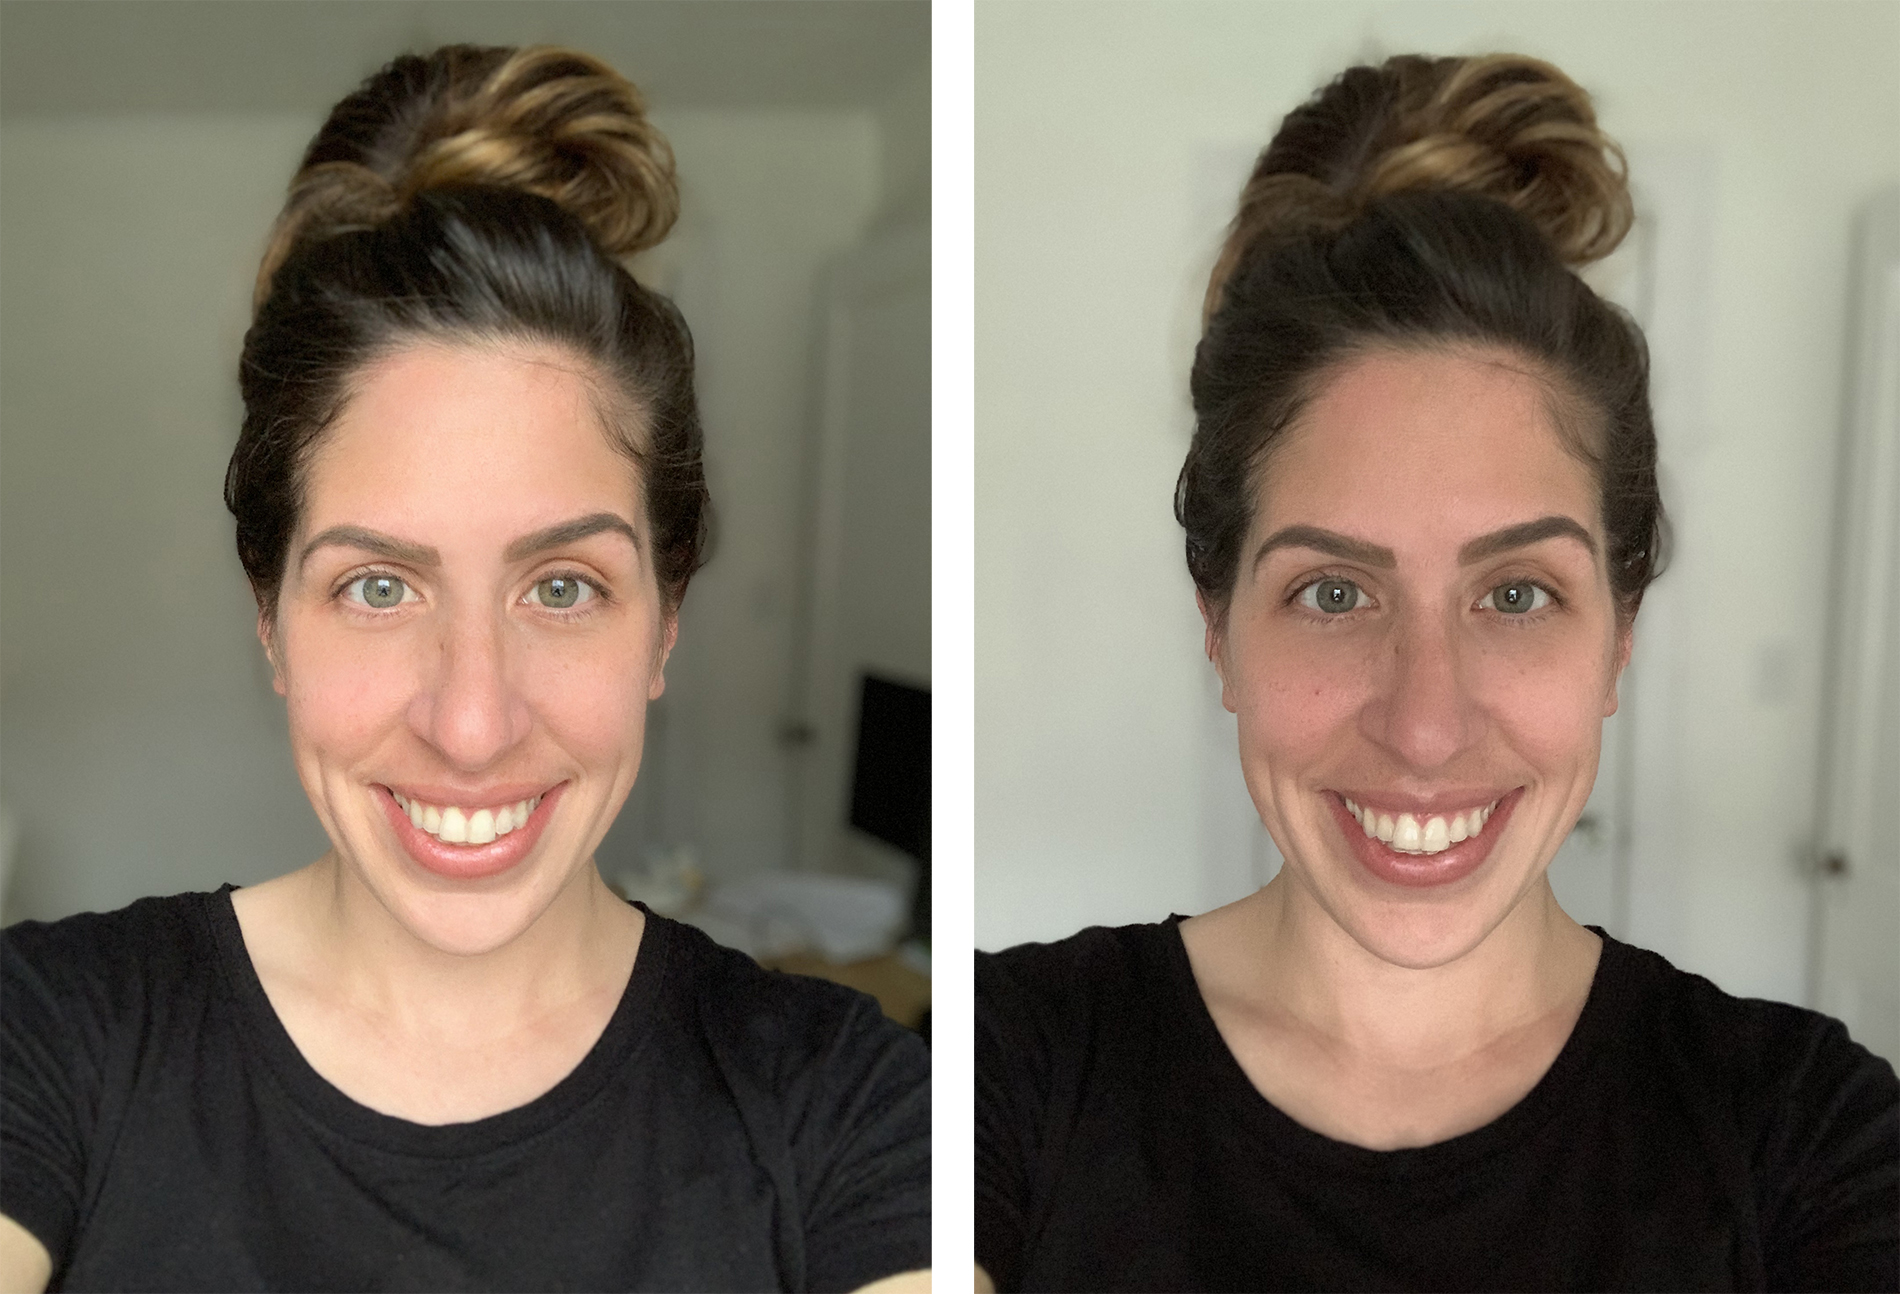
The last note I’d like to add about positioning your light source is distance. Moving closer to and farther from your light source will change your lighting dramatically as well. Compare these two images of me with my light source facing the same direction, but in the second image, I’ve moved farther back from my light. Do you see what a huge difference it makes?
SO WHAT DOES THIS ALL MEAN?
Learning how to identify and position your light source are the first and most fundamental steps in understanding how to use your light to give you better photos, and just understanding these basic tenets of light use will significantly impact your at-home photo results.
Practice using the light in your house, in various windows, at various times of day, and figuring out which light sources you like using best. Depending on what type of photos you need, practice by taking some selfies or portraits of a family member or roommate, or by shooting some objects you find around your house.
Really pay attention to how the picture changes when you move your subject around, push it closer/farther from the window, and change your position to your subject and light source. You’ll soon see how much control you can gain in your image creation, just by controlling your light.
The best way to practice using light is just by trial and error and experimentation. I will touch on different lighting setups that work well in different types of photography as I go through more specific genres such as product photography and portraits, but the crux of the matter is that there are countless variables unique to countless situations, and just paying attention to these things and experimenting with them is the best way to set out on the path to understanding what kind of control you can begin to have in terms of using light.
If you want to learn how to use light even more effectively in your at-home photos, I’ve created a guide that goes over how to modify your light, using homemade reflectors & scrims, how to manage your environment, understanding color issues and white balance, and dealing with highlights and shadows by understanding exposure.